Blynk is another way of sending and visualising data, from the Octopus, besides using Thingsspeak. To use Blynk, one needs to register with Blynk and download the Blynk app (available on iOS and Android).
Set up a remote sensing device on Blynk
To set up a data transmitting device on Blynk, one needs to do the following:
From the Blynk app : – Open the Blynk app on your smartphone. – Click on “new project”. – Choose “esp8266” for the “choose device” question. – Wait for the “Auth Token” email that Blynk has sent.
(then) In ArduBlocks : – In the Setup part of your ArduBlocks sketch, add aWLAN block and a Blynk-Cloud block. – In the WLAN block : specify the name of your wifi network and the password. – In the Blynk-Cloud block : the Copy the Auth Token from the Blynk email, and paste it into the API-Key part of the ArduBlocks Blynk-Cloud block.
As one might not always have an Octopus microcontroller at hand, people have asked me how to build a CO2Ampel – CO2 traffic light warning gadget – with a different microcontroller. Thankfully, such a device was recently assembled at Chaos Computer Club Freiburg.
To keep things inexpensive, we’re skipping the NeoPixel LED of the other tutorial, in this tutorial. Thus parts could be obtained for around 55 EUR. Later, we’ll cover how to connect the measuring device described here, to various displays . Also, those interested in finding further tips and information, can find more information in the Octopus section of this blog. (This post is for the most part identical with the CO2 Messen mit dem Octopus tutorial, also on this blog.)
Parts
I have provided links to the Mouser Onlineshop and to Tindie. You can also find the parts elsewhere, and my links aren’t affiliate links.
Node MCU (microcontroller, controlling the other elements ), via Amazon or Mouser.
CO2 sensor SCD30 – these are available with different interfaces. Eg. With a Grove connector – although often sold out – as well as without. In the case of the CO2 sensors without a grove connector, one needs to solder or otherwise connect it to the microcontroller. Slightly cumbersome but manageable. (Digikey from 53 EUR, RS Online from 72 EUR, Mouser around 50 EUR – at time of writing these were sold out, but new ones are orderd)
LCD panel – To display the data from the CO2 sensor. There are several variants, also with Grove connectors. From 6 EUR. from Mouser.
A power source – Likely you already have one – a USB charger. Just make sure you have a Micro-USB cable. Powerbanks are an alternative, especially if you want to carry the device around.
I2C Hub – a hub connecting several Grove connector cables. Grove connector cable – 2.5 EUR by Mouser.
A case – There are many ideas around. From Ikea picture frames, to Bird houses.
A Data ready USB cable – You probably have one at home, but may have to try several USB cables before you find one that can transmit data as well as power. Please note, quite often the USB cables one gets with various bits of electronics can only carry power. So it makes sense to try different USB cables if USB cable one doesn’t work.
Programming
To program Arduino code with visual programming (Ardu)blocks, we need to modify the Ardunio IDE code editor a bit. (For those that prefer text-code, you’ll find the produced Ardublocks code, in text form, at the end of this tutorial).
Windows: download the zip file with the ‘blocky’ Arduino IDE and then install the relevant hardware driver software. Install the Arduino into a very short File tree, et. C:/iotw. You may also have to take care if you have another Arduino Version already installed. Pay attention which do you start. Start by double clicking on the „IOTWerkstatt.bat“ file.
Mac OS: this is a bit more complicated compared to Windows, but accomplishable using these instructions (in German, again), or the ones below. Here too, you need to install the relevant hardware driver software, and download the special Arduino IDE. This is done as follows:
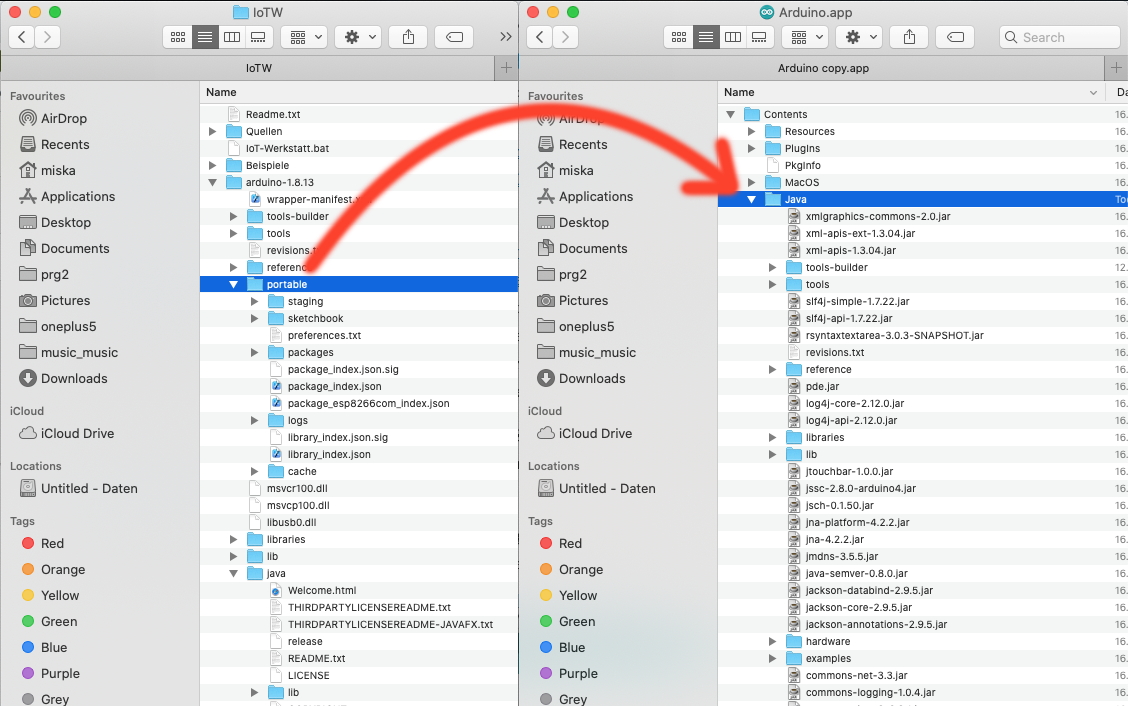
Following the installation of the Arduino IDE, right-click on the Arduino IDE icon, and select “Show package content” from the menu. This shows the files that make up the Arduino IDE.
Open the “Contents” folder of the just-opened Aruduino package.
Open the downloaded IoTW.zip file.
Drag the “Portable” folder (of the expanded IoTW.zip file ) into the “Java” folder of the expanded Arduino IDE files.
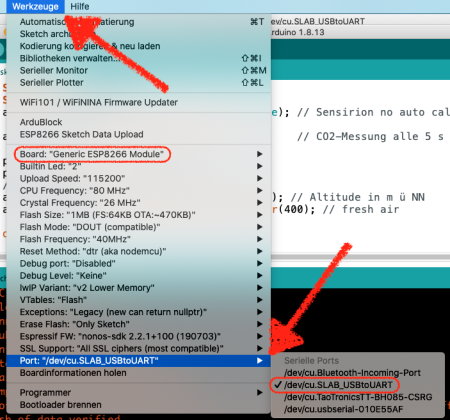
Now open the Arduino IDE.
Open the “Tools” menu and go to Port submenu, and select “Dev/cu.SLAB_USBtoUART” option, to select the right port.
Open the “Tools” menu, as before, and now open the “Board” submenu, and select the “Generic ESP8266 Module”, as our board.
Cabling
The ESP9266 is cheap and can be used as the microcontroller for the CO2 Traffic lights.
Connect yellow on the D1, white on the D2, black on the GND, and red on the 3V. The cables connect with the Node MCU as shown in the table below. Now we need to solder them into place.
Node MCU pin
I2C / Grove Cable
3.3 V
red
GND
black
D1
yellow / SCL
D2
white / SDA
Here and now is a good time to solder the (Grove) cables to the Node MCU. Then we can do fun things like connect a Grove LCD and a SCD30 CO2 sensor to the Node NCU, via a I2C hub. As the grove Cables have preset colours, this should be simple.
Now it’s time to have a look at sending the data the Octopus microcontroller has measured, through its own sensors or attached ones, over the net. For this tutorial, we’ll use the Octopus microcontroller’s on-board Bosch BME680 sensor.
Note for Mac and Pi users: Unfortunately, there’s an incompatibility with the Mac OS compiler and the Bosch BME680 BEC driver. Things fail in the compilation stage. A workaround is to read a single BME680 value at a time, or use a different BME680 driver, without BSEC. Sometimes it works, just try or use a windows system
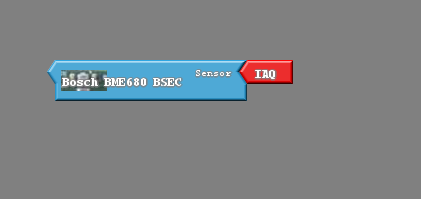
The BME680 BSEC is a great sensor, which can measure:
IAQ – Air Quality Index (AQI). AQI values between 0-100 means the air is relatively ok. AQI values between 100 and 200 means it’s a good idea to ventilate regularly. Values above 200 indicate one needs to ventilate urgently.
The AQI value is calculated based on several factors. Thankfully we don’t need to worry about performing the calculations oursleves. The BME680 BSEC library does the complex calculations, and simply delivers us an AQI number. Simply select things relevan in the BSEC Block (the red arrow) and get the AQI value.
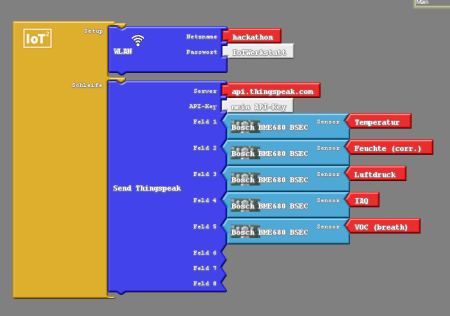
Thingsspeak Block with Bosch BME680 SEC in ArduBlocks
Turning it on. From the left: Lea Treicks (Badenova), Dieter Salomon (Mayor of Freiburg), Sebastian Müller (TTN Community Freiburg), Thorsten Radensleben (CEO of Badenova).
At the same even the Lord Mayor declared that he wants to become the patron of the The Freiburg The Things Network Community.
“With my patronage, I support the new The Things Network Community Freiburg and promote cooperation between this community, the city administration and the society. (…) The Things Network Community Freiburg offers citizens the ability to actively participate in the digital transformation of our city with a cost-effective and open approach. Self-interest, the will to implement solutions and a sense of responsibility towards the community provide a fertile ground for creativity in favour of a solution-oriented urban development.”
The mayor of #Freiburg is now patron of the @thethingsntwrk community #Freiburg. Also our local energy provider @badenovaAG sponsoring a couple of ttn gateways. Der OB von Freiburg wird Schirmherr der TTN Freiburg Community. @badenovaAG sponsort uns mit Gateways. #SmartCity
— TheThingsNetworkFreiburg (@TTN_Freiburg) March 28, 2018
Currently there are ten active Gateways in the City of Freiburg. A variety of institutions and individuals have already put ups their Gateways and several institutions have announced they will participate. Apart from individuals, the Haufe Lexware publishing house, Fraunhofer Institut for Physical Measurement Techniques, FreiLAB and Atec Software have put up Gateways, and several other gateways have been announced. The Chamber of Industry and Commerce, the Coworking Space at Martinstor and the Chaos Computer Club want to set up a Gateways, too.
Together with the infrastructure provided by our local energy and water company we will become one of the top cities with TTN coverage in Germany and second only to the leading communities in Amsterdam and Zürich.
The TTN Freiburg Community regularly organises workshops, so that the network can be used competently and continues to grow.
The story behind it is explained very simply: One day I decided to visit the people of luftdaten.info in Stuttgart and have a look at their project. They have cleverly designes a particular matter sensor for both PM10 and PM2.5 that costs less then 30 Euros.
Because of their small size, particles on the order of 10 micrometers or less (PM10) can penetrate the deepest part of the lungs such as the bronchioles or alveoli.Similarly, so called fine PM, (often referred to as PM2.5), tend to penetrate into the gas exchange regions of the lung (alveolus), and very small particles (< 100 nanometers) may pass through the lungs to affect other organs. So these particles are not something you should take lightly. And these particulates are a good indicator for other Air polutants such as NOx. Both are caused by burning stuff, either to heat your house or when you drive around in a car.
The effects of inhaling particulate matter that have been widely studied in humans and animals include asthma, lung cancer, cardiovascular disease, respiratory diseases, premature delivery, birth defects, and premature death.
In Europe PM10 particulates should not exceed 50 µg/m3 on a Daily average for more then 35 days. The worst air in Germany is often found in Stuttgart, but Freiburg beeing in a valley also has problems. Thats why I decided to put upt he first sensor from this citizen science network.
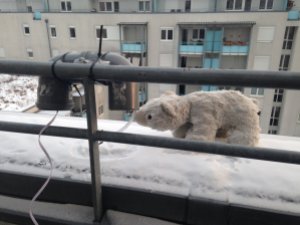
The graphics you see are taken from my sensor outside on my balcony. The grey thing next to my little polar pear houses the sensor. You can build these fairly easy yourself.
These graphics should be refreshed every 15 min. This one shows the measurement over one week. Note 50 µg/m3 are the limit:
Right now I and three other people from the umbrella organisation of youth councils in Baden-Württemberg are on our way to Armenia, or as the natives call it Hayastan. We will go there to study youth participation and informal education. The trip is financed by the youth in action program of the EU and organised by the Polish Fundacja Civis Polonus. I hope to gain many insights into this country in „wilder“ Europe.
Whilst preparing I found this quote from a book about the Caucasus:
„Given all these problems, can one ever really think of the Caucasus as Europe? To conceive of Europe as a place that does not stop at the Oder River or even the Bosphorus became possible once Europe refashioned itself as a set of values rather than a self-evident set of boundaries.
Seeing things in that way has required a gargantuan effort to forget, to shove into the dark corners of the past those values that have most often defined Europeanness: nationalism, chauvinism, and a penchant for the authoritarian state.
In other words, it requires that today’s Europeans and those who wish to join them continue to do what they have done since 1945—to engage in a collective rethinking of the past that enables a creative, liberating, and humane imagining of the future.“ King, C. (2008). The Ghost of Freedom:A History of the Caucasus. Oxford University Press, USA.
It summs the situation, as far as I could gather from books, up very well. Now I’m eager to see the real thing. I’ll keep you updated here on my blog and also on my twitter. I hope to show you some pictures as well.
We will fly out there tonight arrive very early in the morning in Eriwan and then have parts of monday off, the meetings will start on tuesday and we will all be back on monday the 5th.
Last weekend we were at the Evaluation and Monitoring Seminar for PMI here in the province. Although we didn’t understand a lot because most of the stuff was in Indonesian, but it seemed to be a lot of things I had at PH Freiburg previously. We have a very nice video as well.
In the evening we went celebrating my birhthday by going to the Cinema and on Monday we had some Karaoke.
Kommentare werden geladen …
Du muss angemeldet sein, um einen Kommentar zu veröffentlichen.


Du muss angemeldet sein, um einen Kommentar zu veröffentlichen.