Blynk is another way of sending and visualising data, from the Octopus, besides using Thingsspeak. To use Blynk, one needs to register with Blynk and download the Blynk app (available on iOS and Android).
Set up a remote sensing device on Blynk
To set up a data transmitting device on Blynk, one needs to do the following:
From the Blynk app : – Open the Blynk app on your smartphone. – Click on “new project”. – Choose “esp8266” for the “choose device” question. – Wait for the “Auth Token” email that Blynk has sent.
(then) In ArduBlocks : – In the Setup part of your ArduBlocks sketch, add aWLAN block and a Blynk-Cloud block. – In the WLAN block : specify the name of your wifi network and the password. – In the Blynk-Cloud block : the Copy the Auth Token from the Blynk email, and paste it into the API-Key part of the ArduBlocks Blynk-Cloud block.
As one might not always have an Octopus microcontroller at hand, people have asked me how to build a CO2Ampel – CO2 traffic light warning gadget – with a different microcontroller. Thankfully, such a device was recently assembled at Chaos Computer Club Freiburg.
To keep things inexpensive, we’re skipping the NeoPixel LED of the other tutorial, in this tutorial. Thus parts could be obtained for around 55 EUR. Later, we’ll cover how to connect the measuring device described here, to various displays . Also, those interested in finding further tips and information, can find more information in the Octopus section of this blog. (This post is for the most part identical with the CO2 Messen mit dem Octopus tutorial, also on this blog.)
Parts
I have provided links to the Mouser Onlineshop and to Tindie. You can also find the parts elsewhere, and my links aren’t affiliate links.
Node MCU (microcontroller, controlling the other elements ), via Amazon or Mouser.
CO2 sensor SCD30 – these are available with different interfaces. Eg. With a Grove connector – although often sold out – as well as without. In the case of the CO2 sensors without a grove connector, one needs to solder or otherwise connect it to the microcontroller. Slightly cumbersome but manageable. (Digikey from 53 EUR, RS Online from 72 EUR, Mouser around 50 EUR – at time of writing these were sold out, but new ones are orderd)
LCD panel – To display the data from the CO2 sensor. There are several variants, also with Grove connectors. From 6 EUR. from Mouser.
A power source – Likely you already have one – a USB charger. Just make sure you have a Micro-USB cable. Powerbanks are an alternative, especially if you want to carry the device around.
I2C Hub – a hub connecting several Grove connector cables. Grove connector cable – 2.5 EUR by Mouser.
A case – There are many ideas around. From Ikea picture frames, to Bird houses.
A Data ready USB cable – You probably have one at home, but may have to try several USB cables before you find one that can transmit data as well as power. Please note, quite often the USB cables one gets with various bits of electronics can only carry power. So it makes sense to try different USB cables if USB cable one doesn’t work.
Programming
To program Arduino code with visual programming (Ardu)blocks, we need to modify the Ardunio IDE code editor a bit. (For those that prefer text-code, you’ll find the produced Ardublocks code, in text form, at the end of this tutorial).
Windows: download the zip file with the ‘blocky’ Arduino IDE and then install the relevant hardware driver software. Install the Arduino into a very short File tree, et. C:/iotw. You may also have to take care if you have another Arduino Version already installed. Pay attention which do you start. Start by double clicking on the „IOTWerkstatt.bat“ file.
Mac OS: this is a bit more complicated compared to Windows, but accomplishable using these instructions (in German, again), or the ones below. Here too, you need to install the relevant hardware driver software, and download the special Arduino IDE. This is done as follows:
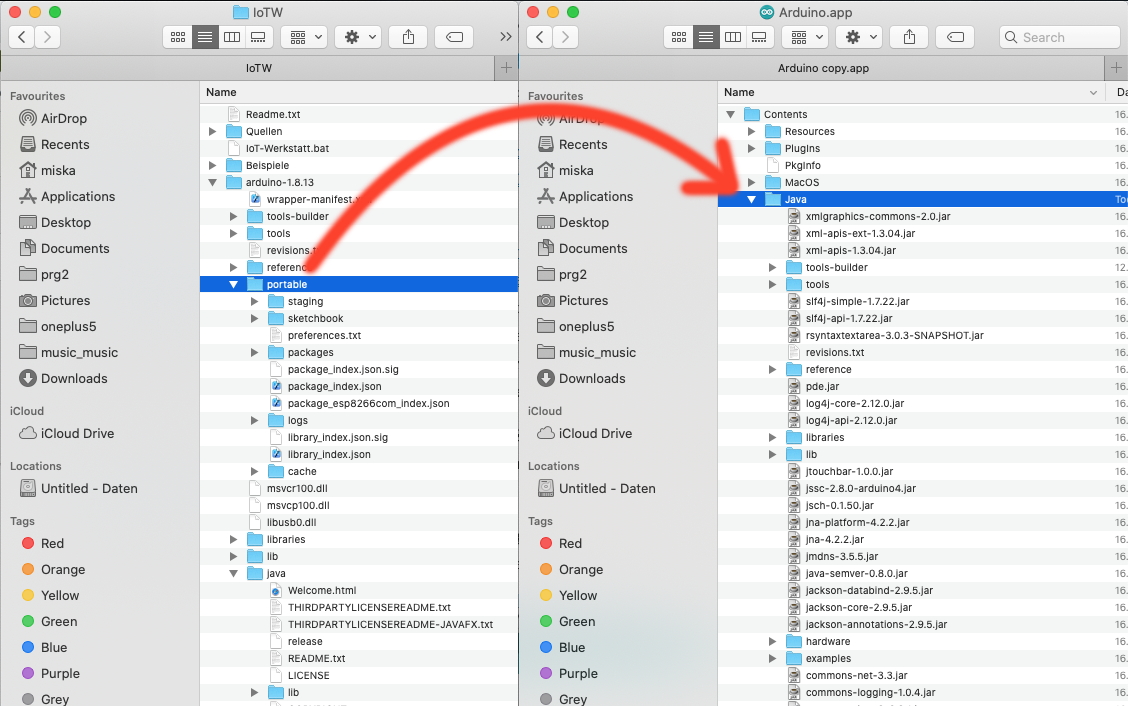
Following the installation of the Arduino IDE, right-click on the Arduino IDE icon, and select “Show package content” from the menu. This shows the files that make up the Arduino IDE.
Open the “Contents” folder of the just-opened Aruduino package.
Open the downloaded IoTW.zip file.
Drag the “Portable” folder (of the expanded IoTW.zip file ) into the “Java” folder of the expanded Arduino IDE files.
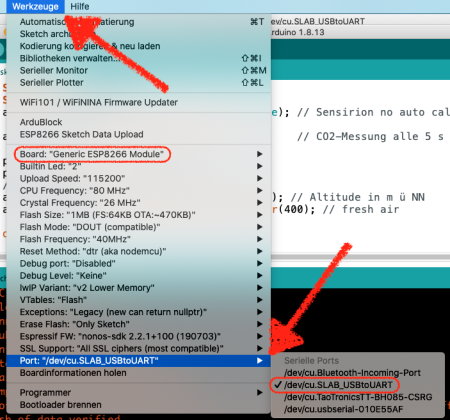
Now open the Arduino IDE.
Open the “Tools” menu and go to Port submenu, and select “Dev/cu.SLAB_USBtoUART” option, to select the right port.
Open the “Tools” menu, as before, and now open the “Board” submenu, and select the “Generic ESP8266 Module”, as our board.
Cabling
The ESP9266 is cheap and can be used as the microcontroller for the CO2 Traffic lights.
Connect yellow on the D1, white on the D2, black on the GND, and red on the 3V. The cables connect with the Node MCU as shown in the table below. Now we need to solder them into place.
Node MCU pin
I2C / Grove Cable
3.3 V
red
GND
black
D1
yellow / SCL
D2
white / SDA
Here and now is a good time to solder the (Grove) cables to the Node MCU. Then we can do fun things like connect a Grove LCD and a SCD30 CO2 sensor to the Node NCU, via a I2C hub. As the grove Cables have preset colours, this should be simple.
Now it’s time to have a look at sending the data the Octopus microcontroller has measured, through its own sensors or attached ones, over the net. For this tutorial, we’ll use the Octopus microcontroller’s on-board Bosch BME680 sensor.
Note for Mac and Pi users: Unfortunately, there’s an incompatibility with the Mac OS compiler and the Bosch BME680 BEC driver. Things fail in the compilation stage. A workaround is to read a single BME680 value at a time, or use a different BME680 driver, without BSEC. Sometimes it works, just try or use a windows system
The BME680 BSEC is a great sensor, which can measure:
IAQ – Air Quality Index (AQI). AQI values between 0-100 means the air is relatively ok. AQI values between 100 and 200 means it’s a good idea to ventilate regularly. Values above 200 indicate one needs to ventilate urgently.
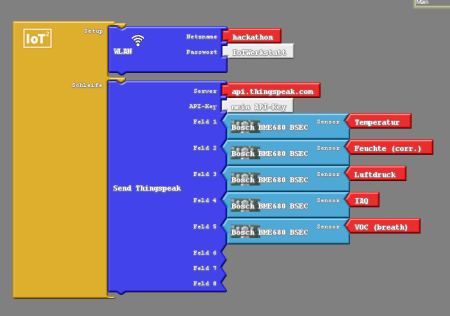
The AQI value is calculated based on several factors. Thankfully we don’t need to worry about performing the calculations oursleves. The BME680 BSEC library does the complex calculations, and simply delivers us an AQI number. Simply select things relevan in the BSEC Block (the red arrow) and get the AQI value.
Thingsspeak Block with Bosch BME680 SEC in ArduBlocks
Keeping track of a moving and easily stolen object, like a bikecylcle can be an challenge. Of course you can try to remember where you parked your bike and then go back to the place. But what if it is stolen? It would be helpful to attach a little device to your bike that sends its position to a webservice and then on to your mobile phone.
Currently most systemsmost systems either log the data on file or use a GSM sim card and data tarif to send the location information to a server. Usually such a sim card has a monthly bill.
But what if we use the Long Range Wireless Network provided in Freiburg by The Things Network Freiburg Community. The network already covers large parts of town and is expanding. And how can we use this application without programming. I can’t programm and so writing code and maybe a server application is out of the question for me.
See it on your telegramm channel!
But there are several good webservices that can helpd: IFTTT with a telegram channel integration.
What do we need?
Zane Systems: ztube, which was supplied kindly by Zoltan
zTracker Configuration Tool
a TTN Account, Application and acess to the console
decoder function
webhook
an IFTT Applet that pushes the data to a telegramm channel
telegramm account
For hardware we used the zTube from Zane Systems, its currently about 70 € but I had bought a previous version of the tracker before and so he send me a zTube and zTrack Midi by Express TNT, which we got on Friday at the same day the hackaton started.
When I got the zTube I went to the TTN Console and put in the data. Meaning I set up a new application, klicked on „add device“. You can add the DEVICE EUI which is printed on the label of the zTube and set it up from there. As a configuration I set it to „ABP“ not OTA and disabled Frame Counter Checks. The rest of the configuration I left as it was. I’m not even sure if I had to disable frame counters.
You can configure both with the zTrack Configuration Tool. As a configuration we entered the following data:
Sometimes the zTube does not find a gps fix, then this data is empty. If it does it looks like this in the function:
I’m not yet sure what is the optimal configuration for the zTube, as I don’t want to overuse the bandwith but also get good tracking results.
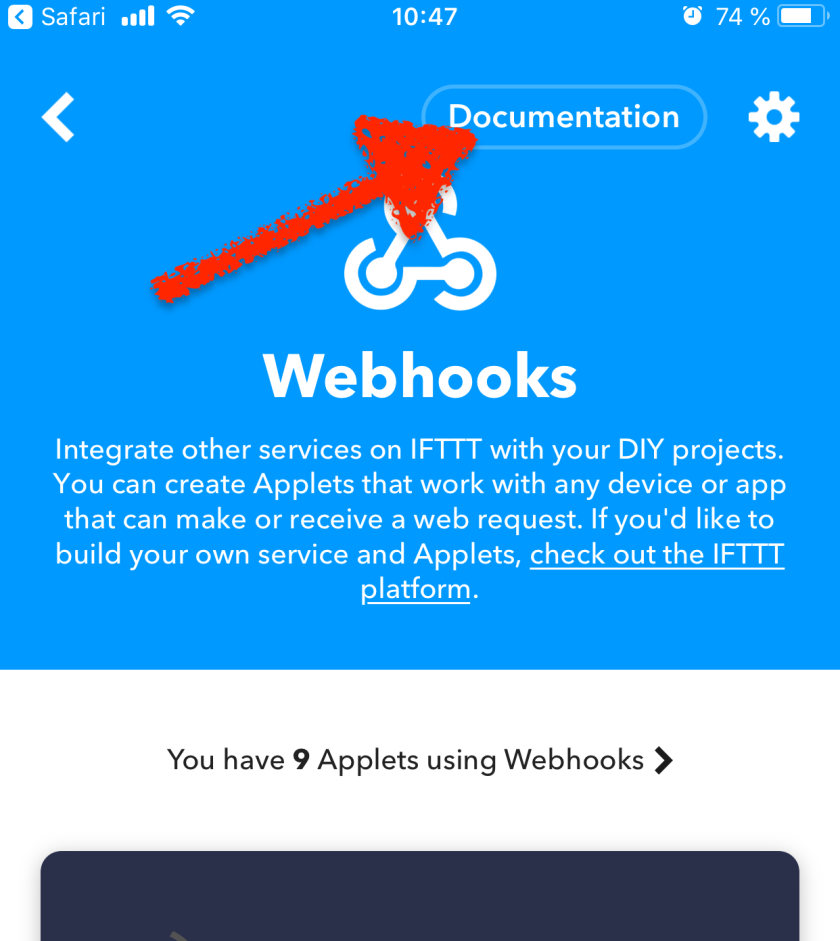
Now for the IFTT integration: Install IFTT on the phone. It seems to be much easier to do all the stuff on the phone and not on the website. Get an acoount and so on. Then go to the browser and google „IFTT webhooks“, then open the webhooks page in the iftt app. press on the „Documentation“: is show your key. Copy the key into notes.
Click on documentation.
You will then be lead to a website again with your key. Copy the key to notes or send it to you by email. You will need it to enter later.
Turning it on. From the left: Lea Treicks (Badenova), Dieter Salomon (Mayor of Freiburg), Sebastian Müller (TTN Community Freiburg), Thorsten Radensleben (CEO of Badenova).
At the same even the Lord Mayor declared that he wants to become the patron of the The Freiburg The Things Network Community.
“With my patronage, I support the new The Things Network Community Freiburg and promote cooperation between this community, the city administration and the society. (…) The Things Network Community Freiburg offers citizens the ability to actively participate in the digital transformation of our city with a cost-effective and open approach. Self-interest, the will to implement solutions and a sense of responsibility towards the community provide a fertile ground for creativity in favour of a solution-oriented urban development.”
The mayor of #Freiburg is now patron of the @thethingsntwrk community #Freiburg. Also our local energy provider @badenovaAG sponsoring a couple of ttn gateways. Der OB von Freiburg wird Schirmherr der TTN Freiburg Community. @badenovaAG sponsort uns mit Gateways. #SmartCity
— TheThingsNetworkFreiburg (@TTN_Freiburg) March 28, 2018
Currently there are ten active Gateways in the City of Freiburg. A variety of institutions and individuals have already put ups their Gateways and several institutions have announced they will participate. Apart from individuals, the Haufe Lexware publishing house, Fraunhofer Institut for Physical Measurement Techniques, FreiLAB and Atec Software have put up Gateways, and several other gateways have been announced. The Chamber of Industry and Commerce, the Coworking Space at Martinstor and the Chaos Computer Club want to set up a Gateways, too.
Together with the infrastructure provided by our local energy and water company we will become one of the top cities with TTN coverage in Germany and second only to the leading communities in Amsterdam and Zürich.
The TTN Freiburg Community regularly organises workshops, so that the network can be used competently and continues to grow.
Today my Atmotube arrived, or rather I had to go to my post office and pay 14,08 € customs duty to get it. The waiting time was not that pleasant as I had to wait since 20th of September 2017 when I ordered the device. Apparently the system, couldn’t work with my last name „Müller“ and made it into somethin strange. Umlaute? Have you heard about them?
While opening the package I cut my finger. Then I had to open another cardbord box and then finally a round tube like box in which was another round box, a usb-c cable and little snap hook.
the package
the actual package
it seemed to have been opened – maybe by customs?
very nice packaging
the content
the atmotube with its hook
The actual atmotube is made from metal and feels quite heavy for such a small device. It comes with a very tiny manuel (7cm high). Before using it I had to charge it and download the app to my iPhone. „My Life with the Atmotube“ weiterlesen
While there have been various funny things said and while Trump gives us heaps of stuff to make fun about him, his work and his various actions, there are some serious concerns. I have selected some articles here, that will sheed very diffrent lights on the phenomena. Some of the views are totall opposed to each other. So please read yourself and try to make up your own mind.
So here is my Reading List:
In the Atlantic Magazinbe David Frum (March 2017 Issue) argues that Trump will not built an authoritarian state. He will just be someone who wants to make a lot of money and thus open a East European style kleptocracy: „Donald Trump will not set out to build an authoritarian state. His immediate priority seems likely to be to use the presidency to enrich himself. But as he does so, he will need to protect himself from legal risk. Being Trump, he will also inevitably wish to inflict payback on his critics. Construction of an apparatus of impunity and revenge will begin haphazardly and opportunistically. But it will accelerate. It will have to.“How to built an Autcracy The Article is really worth reading.
In The Monthly, an Australian Magazine, Robert Manne collects all the konwn connections of Donald Trump to Russia and it’s intelligence services. The article is a rather cool and well written, it provides a comprehensive overview of all allegations in the press about the russian involvement of Trump and his allies so far. From Michal Flynn, WikiLeaks, Steele dossier, 19% share in Rosneft, Paul Manafort, Carter Page and the Republican activist Roger Stone,…: „The Muscovian Candidate? Donald Trump and Russia“
There is an intresting discussion on how planned and competent the Trump administration actually is. Are things like the Muslim Ban the opening shots in a coup d’etat? Yonatan Zunger claims so in a widely shared piece on medium. He is a google privacy egineer.
Reading the same tea leafs, political scientist Tom Pepinsky, which I met once in Freiburg, comes to a totally diffrent conclusion: „I am equally taken by the argument that everything that Zunger identifies is evidence not of a deliberate planning by an aspiring authoritarian, but of the exact opposite: the weakness and incoherence of administration by a narcissist.“ Trump is simly weak ruler. See also this Post of his blog on the use of Media by narcissts and authoritarians.
Comminb ack to Yonatan Zunger: He explains in another bleak post on medium, what are the three scenarios for the Trump presidency and none of them look good. The Washington Post has an entire section on his „cult of the paranoid medium post“ and why we shoudl never retweet.
An intresting pick on the developments in the US is provided by http://www.electoral-vote.com/ they do not lonly count votes or polls but also give backgroudn news.
On Monday we opend our exhitbiton on ReDesign of Society 2040. Which Utopia do we want? How can we reclaim the future?
There are two exhibits in which I participated: The republic of knowledge and Finnland as a Utopia. I will post later information to the republic of knowledge our proposal to a new more democratic form of schooling. Which I designed with two other students from Aalto university: Soujanyaa Boruah, Jami Sarnikorpi.
I had the following idea: Often people travel to Finland and report from it. And these reports are often used as a projecton space to highlight things you want for your own country. Very explicit was this in the reports in Germany about the Finish Education System:
Finnland the education utopia?
In 2000 the results of the PISA study on student achievements were published. Germany was rated dismal and Finnland best. The German media invented a new term „Pisaschock“. (literally schocked by Pisa results) German scientists, politicians, teachers, students and journalists flew to Finland and tried to find out why it was so good. Everyone who traveled found design decisiosn that suited his ideology or preconceptions: Some concluded it was the one school for all, others that it was the good social status of the teachers, others progressive or conservative teaching methods, the lutheran tradition of literacy, free school food or even the cold weather where children stay at home and read instead of playing outside. Less utopian aspects were never highlichted. Indeed after some years of study most scientists concluded it was a range of factors and they could not easily point it down. But indeed everyone could project onto Finland what he oer she liked…
So why does Finland function so well as an utopia?
And with some thinking you may find other examples of this in present day media. Finnland ist distant and close at the same time. Distant in the sense that you have to fly for more then two hours from Frankfurt or take a boat for about 20 hours to travel from Germany to it. It’s language is very distant from German, although it has numerous German loan-words (teigi – Teig, Kaffeepaussi – Kaffepause, kivääri – Gewehr, …).
It is a country where very few Germans go on holiday unlike Sweden, Italy or Spain and it is fairly small. For most of its history it was also not important as a trading partner or source of raw materials for Germany. And it is a rather dull and peaceful place with no conflict or burning political issue to report on. If German media have a correspondent the person is in Stockholm and covers all of Scandinavia and maybe even the Baltics. All this makes it easy for the occasional traveling reporter, scientist or political entrepneur to pass through and pass back information about the wonders of this great society and country. Some examples you find here. And indeed there are many wonderous things to report, but often they are simplified and have not one particular source: the baby box is not the sole reason for low child mortality, the well repsrected teacher not the sole source for good PISA results and so on…
The most controversial of the four sides on the Finland as an utopia pillar is the „Nazi Utopia“ side. I do not claim that Finland ever was a Nazi utopia. But I claim that at some point in the past it was marketed to Germans as such.
The exhibtion is open until 5th of June and it its in the ground floor of Kluvi Shoping centre:
Kommentare werden geladen …
Du muss angemeldet sein, um einen Kommentar zu veröffentlichen.


 Then in the console you have to enter a decoder function. As a base we used function developed by


Du muss angemeldet sein, um einen Kommentar zu veröffentlichen.