Blynk is another way of sending and visualising data, from the Octopus, besides using Thingsspeak. To use Blynk, one needs to register with Blynk and download the Blynk app (available on iOS and Android).
Set up a remote sensing device on Blynk
To set up a data transmitting device on Blynk, one needs to do the following:
From the Blynk app : – Open the Blynk app on your smartphone. – Click on “new project”. – Choose “esp8266” for the “choose device” question. – Wait for the “Auth Token” email that Blynk has sent.
(then) In ArduBlocks : – In the Setup part of your ArduBlocks sketch, add aWLAN block and a Blynk-Cloud block. – In the WLAN block : specify the name of your wifi network and the password. – In the Blynk-Cloud block : the Copy the Auth Token from the Blynk email, and paste it into the API-Key part of the ArduBlocks Blynk-Cloud block.
As one might not always have an Octopus microcontroller at hand, people have asked me how to build a CO2Ampel – CO2 traffic light warning gadget – with a different microcontroller. Thankfully, such a device was recently assembled at Chaos Computer Club Freiburg.
To keep things inexpensive, we’re skipping the NeoPixel LED of the other tutorial, in this tutorial. Thus parts could be obtained for around 55 EUR. Later, we’ll cover how to connect the measuring device described here, to various displays . Also, those interested in finding further tips and information, can find more information in the Octopus section of this blog. (This post is for the most part identical with the CO2 Messen mit dem Octopus tutorial, also on this blog.)
Parts
I have provided links to the Mouser Onlineshop and to Tindie. You can also find the parts elsewhere, and my links aren’t affiliate links.
Node MCU (microcontroller, controlling the other elements ), via Amazon or Mouser.
CO2 sensor SCD30 – these are available with different interfaces. Eg. With a Grove connector – although often sold out – as well as without. In the case of the CO2 sensors without a grove connector, one needs to solder or otherwise connect it to the microcontroller. Slightly cumbersome but manageable. (Digikey from 53 EUR, RS Online from 72 EUR, Mouser around 50 EUR – at time of writing these were sold out, but new ones are orderd)
LCD panel – To display the data from the CO2 sensor. There are several variants, also with Grove connectors. From 6 EUR. from Mouser.
A power source – Likely you already have one – a USB charger. Just make sure you have a Micro-USB cable. Powerbanks are an alternative, especially if you want to carry the device around.
I2C Hub – a hub connecting several Grove connector cables. Grove connector cable – 2.5 EUR by Mouser.
A case – There are many ideas around. From Ikea picture frames, to Bird houses.
A Data ready USB cable – You probably have one at home, but may have to try several USB cables before you find one that can transmit data as well as power. Please note, quite often the USB cables one gets with various bits of electronics can only carry power. So it makes sense to try different USB cables if USB cable one doesn’t work.
Programming
To program Arduino code with visual programming (Ardu)blocks, we need to modify the Ardunio IDE code editor a bit. (For those that prefer text-code, you’ll find the produced Ardublocks code, in text form, at the end of this tutorial).
Windows: download the zip file with the ‘blocky’ Arduino IDE and then install the relevant hardware driver software. Install the Arduino into a very short File tree, et. C:/iotw. You may also have to take care if you have another Arduino Version already installed. Pay attention which do you start. Start by double clicking on the „IOTWerkstatt.bat“ file.
Mac OS: this is a bit more complicated compared to Windows, but accomplishable using these instructions (in German, again), or the ones below. Here too, you need to install the relevant hardware driver software, and download the special Arduino IDE. This is done as follows:
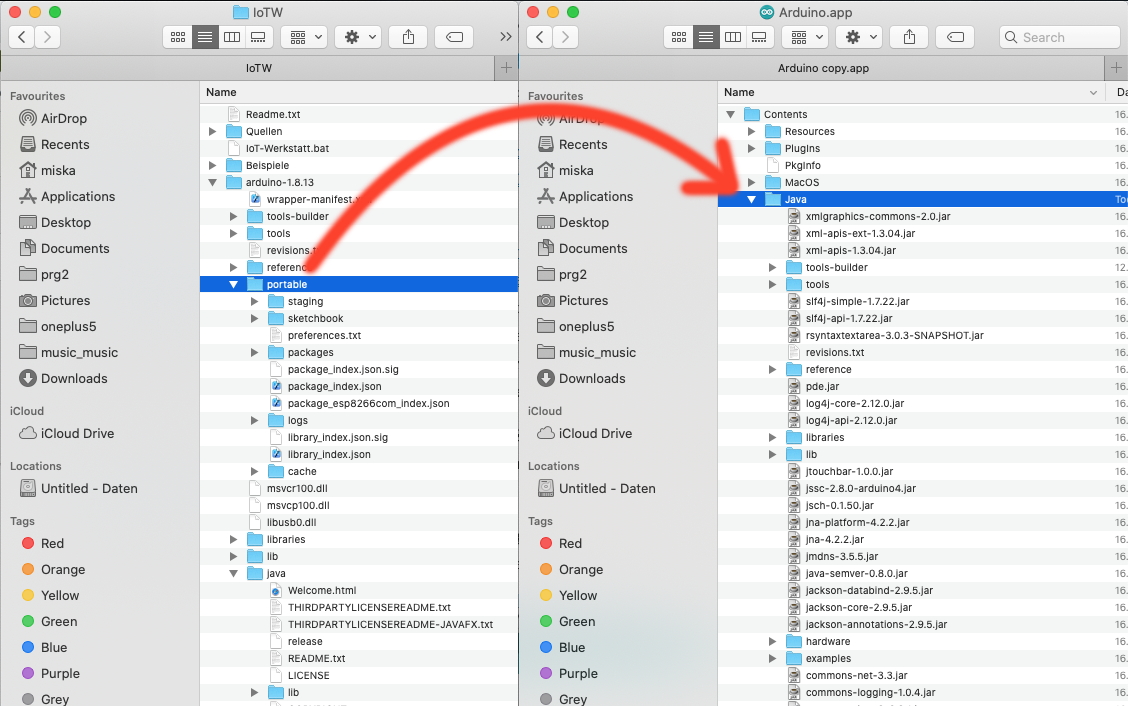
Following the installation of the Arduino IDE, right-click on the Arduino IDE icon, and select “Show package content” from the menu. This shows the files that make up the Arduino IDE.
Open the “Contents” folder of the just-opened Aruduino package.
Open the downloaded IoTW.zip file.
Drag the “Portable” folder (of the expanded IoTW.zip file ) into the “Java” folder of the expanded Arduino IDE files.
Now open the Arduino IDE.
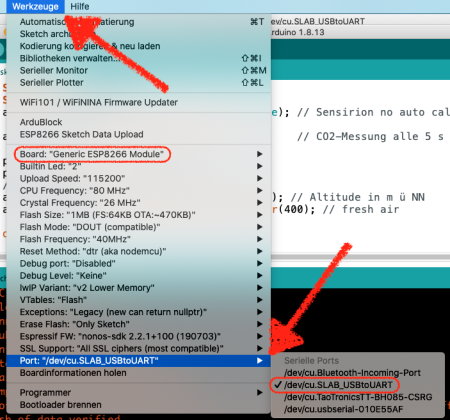
Open the “Tools” menu and go to Port submenu, and select “Dev/cu.SLAB_USBtoUART” option, to select the right port.
Open the “Tools” menu, as before, and now open the “Board” submenu, and select the “Generic ESP8266 Module”, as our board.
Cabling
The ESP9266 is cheap and can be used as the microcontroller for the CO2 Traffic lights.
Connect yellow on the D1, white on the D2, black on the GND, and red on the 3V. The cables connect with the Node MCU as shown in the table below. Now we need to solder them into place.
Node MCU pin
I2C / Grove Cable
3.3 V
red
GND
black
D1
yellow / SCL
D2
white / SDA
Here and now is a good time to solder the (Grove) cables to the Node MCU. Then we can do fun things like connect a Grove LCD and a SCD30 CO2 sensor to the Node NCU, via a I2C hub. As the grove Cables have preset colours, this should be simple.
Now it’s time to have a look at sending the data the Octopus microcontroller has measured, through its own sensors or attached ones, over the net. For this tutorial, we’ll use the Octopus microcontroller’s on-board Bosch BME680 sensor.
Note for Mac and Pi users: Unfortunately, there’s an incompatibility with the Mac OS compiler and the Bosch BME680 BEC driver. Things fail in the compilation stage. A workaround is to read a single BME680 value at a time, or use a different BME680 driver, without BSEC. Sometimes it works, just try or use a windows system
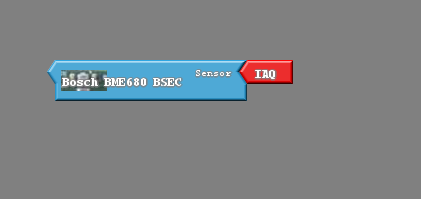
The BME680 BSEC is a great sensor, which can measure:
IAQ – Air Quality Index (AQI). AQI values between 0-100 means the air is relatively ok. AQI values between 100 and 200 means it’s a good idea to ventilate regularly. Values above 200 indicate one needs to ventilate urgently.
The AQI value is calculated based on several factors. Thankfully we don’t need to worry about performing the calculations oursleves. The BME680 BSEC library does the complex calculations, and simply delivers us an AQI number. Simply select things relevan in the BSEC Block (the red arrow) and get the AQI value.
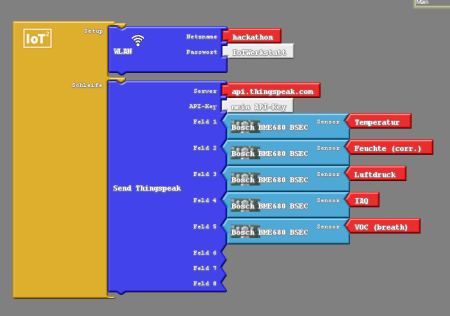
Thingsspeak Block with Bosch BME680 SEC in ArduBlocks
Ein weitere Möglichkeit, neben Thingsspeak, Daten zu verschicken und visuell sichtbar zu machen, ist Blynk. Wir brauchen dazu immer die Blynk App für das Smartphone (iOs, Android), dort müßen wir uns anmelden, mit einer E-Mail Adresse.
Danke für den Blogbeitrag. Für mich ist die Anzeige der CO2-Ampel mit Blynk die beste Lösung. Habe mit drei Blynk-LEDs dort eine echte Ampel nachempfunden. . pic.twitter.com/fUhSAeF7uq
Wir gehen in der App auf „new project“, by „choose device“ wählen wir „esp8266“. Wenn wir dann auf „create project“ drücken, bekommen wir den „Auth Token“ per E-Mail zugeschickt. Das ist ganz praktisch, denn so können wir ihn einfach per copy and paste in die Ardublocks Umgebung überführen.
In den Setup Bereich habe ich die WLAN Daten (Name und Passwort) eingetragen und den Auth token von Blynk (den unter API-Key). Beides sollte man im „Setup“ platzieren und nicht in der Schleife, weil der Octopus diese einmal laden sollte und dann ja im WLAN bleibt.
Über den „Pin“ im Blynk Block können wir unterschiedliche Werte in die App übermitteln. Wir setzen als Pin = 1 für den ersten Wert, etwa IAQ und dann Pin = 2, für den nächsten.
Noch ein Hinweis für diesen Sketch. Anstelle jedes mal den Sensorwert neu messen zu lassen, setze ich den Messwert als „Zahl Variable“ und verwende pro Durchgang (Schleife) immer diesen Wert. Dann muss der Sensor nicht immer neu messen und es geht auch schneller, bzw. es würde auch immer der Wert der angezeigt wird, auch seriell ausgegeben und weitergemeldet.
Der Vorteil ist man spart sich Display und kann die Daten dennoch live sehen, so ein WLAN kann ja auch unterwegs das iPhone aufmachen.
„Zahl Variable“ ist übrigens eine coole Sache. Damit kann man einmal eine Variable definieren und an zentraler Stelle ändern. Dazu sollte sie immer weit oben stehen (und als erstes gesetzt werden), das kann man auch etwa bei Wartezeit nutzten, anstelle eine feste Wartezeit einzugeben, die etwa ein Wert angezeigt werden soll, einfach eine „Zahl-Variable“ Wartezeit definieren und dann bei Bedarf zentral ändern.
Leider ist die Verbindung von Ocotopus und Mac keine sehr glückliche, seit letztem Mittwoch geht es trotz Neuinstallation von Treiber und der speziellen Arduino IDE einfach nicht. Dass die Kombination von Mac und Ocotopus eine ist, die die Macher eine offene Baustelle ist, haben sie mir bereits in einer E-Mail bestätigt. Aber gut, sie machen dieses Projekt in ihrer Freizeit und auch scheinbar ohne Fördermittel!
Aber nun zu den Internet Blöcken. Es finden sich links in der ArduBlock Übersicht ein blauer Block mit dem Namen „IoT: Internet Zugang“, da finden wir einen „WLAN“. In den können wir den Namen unseres Netzwerks und das Passwort eintragen. Es empfiehlt sich diesen Block bei „Setup“ einzutragen, daher dass der Ocotopus das WLAN aufmacht, sobald er sich einschaltet und verbindet, das dauert ein paar Sekunden. Deshalb habe ich mir ein Neopixel als Kontrolle programmiert.
Standardmäßig sucht es ein Netzwerk mit „hackathon“ und ein PW: IoTWerkstatt. Wenn wir einen Hackathon machen, dann können wir tatsächlich ein solches WLAN aufmachen, dann muss keiner die Einwahldaten ändern. Sonst tragen wir hier einfach unsere Daten ein.
Ganz praktisch ist auch der AcessPoint Block. Mit dem kann man den Ocotopus dazu bringen ein eigenes WLAN Netz aufzumachen und mit dem HTTP Server Block kann man direkt darauf zugreifen. Einfach in das WLAN gehen, etwa mit dem Smartphone und im Browser die Adresse http://192.168.4.1 eingeben. Dann kommt auf eine kleine Website auf der Daten angezeigt werden. Was leider nicht geht, ist das man über diese runde Kopplung mit einem der Verbinden Blöcke andere Sensoren dran hängt.
so sieht dann die Website aus
Wir bauen eine Green Energy Anzeige
Nun können wir uns damit eine ganz einfache Anzeige bauen, mit der wir sehen wieviel grünen Strom es gerade im deutschen Stromnetz gibt. Die Daten stammen von der SMARD, der Informationsplattform der Bundesnetzagentur über den deutschen Strommarkt (Strommarktdaten). Netterweise haben uns die Macher vom Umweltcampus bereits ein eigenes Blöckchen gemacht, so dass der Bau einer kleinen Anzeige einfach ist. Zur Sicherheit habe ich zu Beginn noch den Neopixel eingeschaltet und jeweils Farbewechsel nach durchlaufen einer Schleife programmiert. Es scheint, als ob das Gerät, dann doch einige Zeit brauchen würde um sich den richtigen Wert zu holen.
Gute Nachrichten, wie Karte der Südbadischen TTN Knotenbpunkte zeigt: Wir wachsen deutlich auch über Freiburg heraus. Inzwischen ist Freiburg gut abgedeckt und die Stadtverwaltung will sich um Lücken am Tuniberg und in Kappel kümmern. Zudem steht noch das Gateway auf Dach des Chemiehochhauses in Freiburg aus und das auf der Bergstation der VAG. Beide sollten auch bald kommen.
Breisach ist inzwischen gut abgedeckt und Ihringen auch! Quelle: TTN Mapper
In Breisach baut Commeco Solutions GmbH in Zusammenarbeit mit der Stadtverwaltung die Netzabedeckung aus.
Für weite Teile des Markgräflerlands sind wir inzwischen mit den dortigen Volksbanken im Gespräch. Die TTN in ihr Online2Local Netz integrieren wollen, um damit die lokale Wirtschaft zu fördern.
In Emmendingen engagiert sich das Schülerforschungszentrum mit einem Gateway auf dem Dach.
Der Landeplatz Bremgarten wird demnächst wahrscheinlich auch ein Gateway bekommen.
Und wer weiß, wenn Dieter Salomon jetzt IHK Geschäftsführer wird, dann geht es ja vielleicht auch mit denen vorran. Immerhin ist er ja als OB Schirmherr der TTN Community Freiburg geworden.
Das Setup aus Zählrohr, The Things Uno und Steuerungsplatine. Bild: opengeiger.de
Auch im neuen Jahr plant die TTN Comunity Freiburg wieder ein spanndes Basteln: Wir werden zusammen mit Bernd Laquai von opengeiger.de Geigerzähler bauen, die ihre Daten über das TTN Netz übertragen.
Die Preise für das Bastelset werden wahrscheinlich bei um die 100 EUR liegen. Leider sind die Komponenten, insbesondere der The Things Uno recht teuer.


Du muss angemeldet sein, um einen Kommentar zu veröffentlichen.