

Now it’s time to have a look at sending the data the Octopus microcontroller has measured, through its own sensors or attached ones, over the net.
For this tutorial, we’ll use the Octopus microcontroller’s on-board Bosch BME680 sensor.
Note for Mac and Pi users: Unfortunately, there’s an incompatibility with the Mac OS compiler and the Bosch BME680 BEC driver. Things fail in the compilation stage. A workaround is to read a single BME680 value at a time, or use a different BME680 driver, without BSEC. Sometimes it works, just try or use a windows system
The BME680 BSEC is a great sensor, which can measure:
- Air pressure
- Relative humidity ( rH )
- Temperature
- VOC – Volatile Organic Compounds.
- IAQ – Air Quality Index (AQI). AQI values between 0-100 means the air is relatively ok. AQI values between 100 and 200 means it’s a good idea to ventilate regularly. Values above 200 indicate one needs to ventilate urgently.
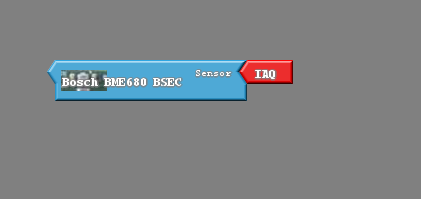
The AQI value is calculated based on several factors. Thankfully we don’t need to worry about performing the calculations oursleves. The BME680 BSEC library does the complex calculations, and simply delivers us an AQI number. Simply select things relevan in the BSEC Block (the red arrow) and get the AQI value.
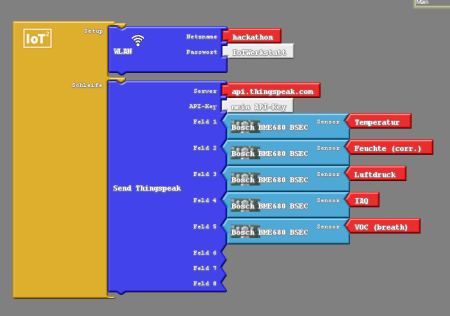
Thingsspeak Block with Bosch BME680 SEC in ArduBlocks
Sending measured data with Thingsspeak
Data can be sent from the Octopus, using the free Thingsspeak open source project and service. One can use the Thingsspeak website for free, for personal or educational purposes. Alternatively, one could also install the Thingsspeak software on a Raspberry PI, and use it as a Thingsspeak data receiving server. Using a Raspberry PI with Thingsspeak provides a low cost and low power solution.
In this tutorial, and for my own purposes, I’ll be using the cloud based Thingsspeak website solution. For this, we’ll need to set up a Thingsspeak account, allowing us to make a Thingsspeak Channel.

We’ll need to set up an Thingsspeak API key and make sure our code uses it:
- Set up a Thinksspeak account.
- Go to the “My Channels” part of one’s Thingsspeak account.
- Create a new channel, for receiving the Octopus data you want to send.
- Copy the API key from the channel.
- Insert the API key into the relevant ArduBlock, as shown in the picture below. (For illustration purposes, you can see my API key in the graphic. You should though, use your own. I’ve since deleted the API key in the graphic).
- Also remember to set up the right Wifi settings in the ArduBlocks code. Ie add the name of the Wifi network and the relevant password.


When all is set up right and one has entered the right Wifi and Thingsspeak API key details, the received data is visible in the “Private View” part of the Thingsspeak interface. One can assemble a dashboard view of the incoming data, by using the “Add Widget” feature of Thingsspeak. Direct value readouts, line graphs, and various other widgets, like dials, are available for showing the data. Using the dial widget, one can set where the red parts of the dial begins.

One can also set up a „Public View“ of one’s data, in a similar way to the „Private View“. The „Public View“ is visible to anyone that has the url to the page.
Related reading: The details regarding the various Air Quality Index levels and thresholds, is described here.
This article is an english translation, of an article that apperaed ealier on this blog. Its part of the english language series and introduction into the Ocotopus Board, we also give a tutorial on how to build a CO2 Based traffic light system for better ventilation. Thanks to Miska Knapek for the translation.