Derzeit sind keine Basteltermine geplant. Es sind aber noch Bastelkits vorhanden, die verkauft werden. Kosten: 110 EUR pro Ampel bzw. Bastelkit bestehend aus Octopus Platine, 16×2 LCD Display, Grove Zubehör Teile, SCD 30 CO2 Sensor.
Ich kann das sehr empfehlen. Meine damit gebastelte #CO2Ampel leistet seit Wochen wertvolle Dienste in der #Physiotherapie|praxis. Außerdem ist es aktuell ganz schön schwierig, zeitaufwändig und z. T. teuer, sich Einzelkomponenten selbst zu erbeuten. https://t.co/0JPtJaoKMF
Für morgen planen die Freiburger „Querdenker“ und Corona Rebellen einen Infostand und ein Public Viewing der – teilweise abgesagten, Demonstrationen in Berlin. In Medien der Coronaleugner und von Rechtsextremen wird aufgerufen nicht nur friedlich in Berlin zu demonstrieren, sondern wiedermal zu versuchen, das Reichstagsgebäude zu stürmen. Das ist ein klarer Angriff auf die freiheitlich, demokratische Grundordnung und den Kernbereich der parlamentarischen Demokratie und des Grundgesetztes.
Kleines Update: wir sind ab 17:00 auf dem Rathausplatz.
Ich rufe alle Bürger*innen Freiburgs auf, sich einem „Public Viewing“ oder dem Senden „positiver Energie“ für eine solche Aktion entgegen zu stellen. Es gelten die üblichen Abstandsregeln (1,5m) und Maskenpflicht, wir versammelnt uns am 18.11. um 17:00 auf dem Rathausplatz. Mit Abstand und Anstand (sprich Masken). Die Versammlung ist angemeldet.
Die Besitzer des Blumen & Souvenir-Ladens betonen, dass der Strom aus ihrem Laden quasi unter Vorspiegelung falscher Tatsachen erschlichen wurde. Und verwehren sich mit #Coronarebellen und #Querdenker in einen Topf geworfen zu werden!
In einem früheren Beitrag habe ich berichtet unterschiedliche PaxCounter an einem Coffee to go Bike in der Freiburger Innenstadt angebracht zu haben. Die Geräte zählen Corona-Warn-App-Beacons, Bluetooth Geräte und WLAN Geräte. Wir verwenden WLAN Geräte als eine Annährung an die im Umkreis befindlichen Smartphones. Wieviele Leute im Umkreis sind, lässt sich schwierig sagen, da ja nicht alle immer ein Smartphone dabei haben oder WLAN eingeschaltet.
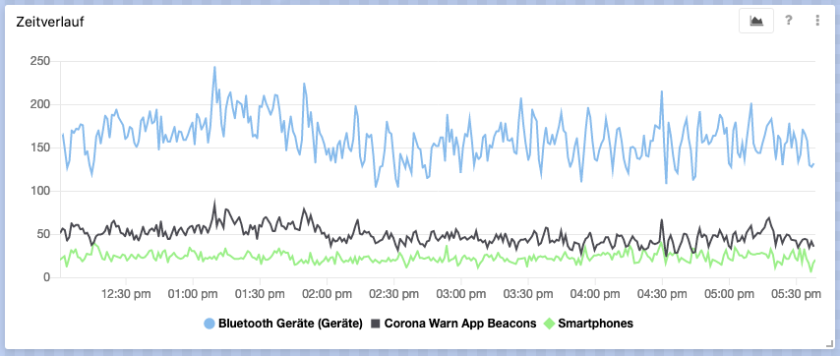
Die Daten vom Donnerstag 12.11.2020 von 11:00 – 18:00
Es scheint so als ob tendenziell mehr Menschen ihr Bluetooth anhaben auf dem Smartphone als ihr WLAN – allerdings werden bei Bluetooth auch zahlreiche andere Geräte gemessen, etwa Kopfhörer oder Smartwatches, die selbst kein WLAN haben.
Ungefähr lässt sich folgendes sagen: Es sind ungefähr 10 mal so viele Bluetooth Geräte zu sehen, wie Corona-Corona-Warn-App Beacons zu sehen sind und ungefähr dreimal so viele Warn-App Beacons wie Handys. Im Durchschnitt sieht er etwas mehr als 48 CWA Beacons (Median 45,5) bzw. 17 Smartphones und 158 BLE Geräte an dieser Stelle.
Die Daten sind natürlich immer mit Vorsicht zu geniessen: Zum einen ist es gut denkbar das ein Handy das in der Nähe ist nicht gemessen wird, weil zb der Körper der es trägt, verdeckt. Auch kennen wir nicht die Reichweite dieser Messung.
Ich versuche eine Einordnung und Zusamemnfassung der Aktiviäten der Freiburger Coronarebellen von Querdenken761 und anderer Gruppen. Seit Ende April beobachte ich im Grunde jeden Samstag die Kundgebungen, Aktionen und Telegramm Gruppen der Freiburger “Corona Rebellen”, zunächst meist die auf dem Münsterplatz, aber auch die auf dem Platz der alten Synagoge oder beim Besuch Bodo Schiffmans. Und habe sogar einmal die Teilnehmer per Fragebogen befragt.
Rechte Gruppen haben sich von Anfang an immer unter dise Rebellen gemischt und sind inzwischen fester Bestandteil dieser Gruppierungen. Abgrenzungversuche gibt es keine. Das Potential in der Region dürfte auf die 350 Personen beschränkt sein, mehr werden es nicht.
Beim diskutieren mit »Freies Mikrophon Freiburg« am 25.7.2020
Zu Beginn hatte ich den Eindruck, dass die Veranstaltungen von Menschen geprägt waren, die direkt durch die von der Landesregierung erlassenen Beschränkungen betroffen waren: Etwa Auftrittsverbote, Verbote das eigene Yogastudio zu betreiben, die Beschränkungen einen Freund nicht sehen zu können, weil der nicht aus der Schweiz einreisen durfte oder auch Angst um den Job im Tourismus-Sektor. Und nicht immer ist nachzuvollziehen, warum das eine erlaubt ist (Frisör), das andere (Piercingstudio) aber nicht. Es gab allerdings auch schon immer einen Zusammenhang mit den Bundesweiten »Hygienedemos« und KenFM-Aktionen.
Ganz zu Beginn waren die Demos weder gut organisiert und es gab zahlreiche Veranstaltungen immer Samstags. Fast schon ikonisch: Die Dame spricht in einen Alulampenschirm. weil kein Megaphon oder ähnliches da war.
Kundgebungen
In Freiburg hatte sich lange Zeit das Kundgebungsgeschehen aufgeteilt. Ganz zu Beginn waren es sogar mehr als zwei Demos. Ich erinnere mich an einen Samstag mit Demos auf dem Münsterplatz, Augustinerplatz, Platz der alten Synagoge und Rathausplatz, die zumindest angekündigt waren. Vom Aussehen nahmen auch sehr diversen Gruppen an diesen Demos teil. Vom 5G-Gegner über Menschen in Kleidung mit rechter Symbolik, bis zum Bürgeriniativen-Publikum.
Eines der Bilder von den »offenes Mikrophon Freiburg« Demos, auf denen lebenslänglichfür Drosten gefordert wrude.
Diese »offenes Mikrophon« Demo zog dann vom Rathausplatz um auf den Münsterplatz. Damit wandelte sich auch das Publikum, von einer eher wirren »5G ist gefährlich« Gruppe hin zu einem deutlich rechten Publikum. So trugen die Menschen eindeutige T-Shirts, eine Maske die stark einer NS-Armbinde mit Virus statt Hakenkreuz, nachempfunden war. Dort wurde auch das »Lebenslänglich für Drosten« Schild hochgehalten.
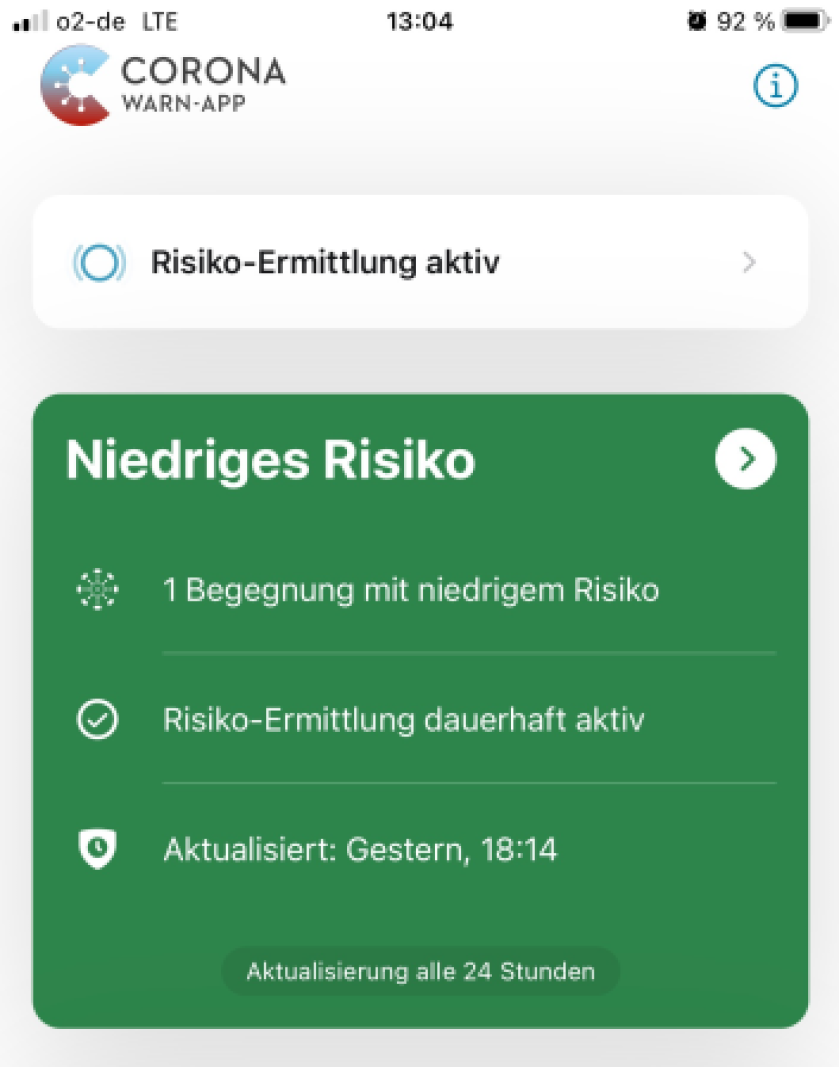
Der Lastenradbarista steht ja mit seinem Coffeebike an verschiedenen Stellen in der Stadt und verkauft Kaffee und andere nette Sachen. Seine Corona-Warn-App zeigte ihm zwischen dem 19. – 27.10 25 niedrige Risikobegegnungen. Das ist sehr spannend, weil eine kleine Umfage in meinem Bekanntenkreis sehr unterschiedliche Antworten gab.
„Sag mal wieviele Risikokontakte hast du in deiner Corona-Warn-App?“ „Keinen einzigen. Und das als Zugfahrer ???“ (er meint Pendler) „1, niedrig“ (Arzt) „0 keiner hat’s ?“ (Unternehmer) „Aktuell null. Hatte aber schonmal einen.“ (Softwareentwickler, Rad zur Arbeit) „Bisher keine Risikobegegnungen“ „Auf dem einen 6, dem anderen 2 (lustig, weil ich immer beide zusammentrage)“ (Journalist) „Ich habe die gar nicht installiert, weil ich als Polizist und Sani ständig so Begegungen hätte“ Das waren zumindest mal die Antworten einer kleinen Umfrage im Bekanntenkreis.
Gleichzeitig mehren sich die Stimmen, die fordern, die Corona-Warn-App zu verbessern. Auch erreichte mich über den CCC Freiburg eine Anfrage der Grünen Landtagsfraktion, die gerne mit Spezialisten darüber sprechen wollte.
Das RKI meldet 21,9 Mio Downloads, davon 11,9 Mio im Android Play Store und 10 Mio im Apple Store. Und 3.000.151 positive und negative Testergebenisse und 44.762 Nutzerinnen und Nutzer ihr positives Testergebnis geteilt. Immerhin haben 58% ihr Testergebniss geteilt. Das finde ich ordentlich.
Aber die Frage bleibt: Wieviele Handys sind denn nun in meiner Umgebung, die die Corona-Warn-App installiert haben? Eine junge, technikaffine und wissenschaftsorientierte Gruppe, dürfte deutlich mehr Durchdringung haben, als etwa alternde Antroposophen von Coronarebellen Demos. (Guter Artikel bei Connect)
Thread: Erste Eindrücke zur Verbreitung der #CoronaWarnApp im Alltag.
Heute sind @m33x und ich durch die Bochumer Innenstadt geradelt ? um zu schauen, wie viele Leute die neue #CoronaWarnApp aktiv verwenden. Wir sind positiv überrascht (1/5) pic.twitter.com/qlBu42F7ts
Darum habe ich zwei Boards TTGO LoRa32 V2.1 _ 1,6 – etwa 18 EUR bei AliExpress, mit der Software PaxCounter bestückt. Die PaxCounter Software war ursprünglich von der Bahn entwicklet worden um anhand der MAC Adressen von Smartphones die ihr Wifi anhaben, ungefähr abschätzen zu können wieviele Personen sich an einem Ort aufhalten. Nung gibt es eine Erweiterung im Code, das sogenannte „Covid-19 Exposure Notification System beacon detection“.
In der Datei PaxCounter.conf, in der man sowieso die Einstellungen für den PaxCounter einstellen kann und muß, kann man dann das Exposure Notification Sensing (ENS) einschalten. Also auf 1 setzen im Code. Dann bekommt man die Daten per TTN übermittelt. Ich habe mir einen TTGO so eingestellt, dass er die Bluetooth Geräte zählt und die Anzahl der Corona Beacons und einen weiteren TTGO, das er die Anzahl der WLAN Geräte bzw. Smartphones zählt und meldet. Das ist alles Datenschutzkonform, es werden keine persönlichen Daten übermittelt, gespeichert oder ausgewertet, lediglich die Anzahl wird übermittelt.
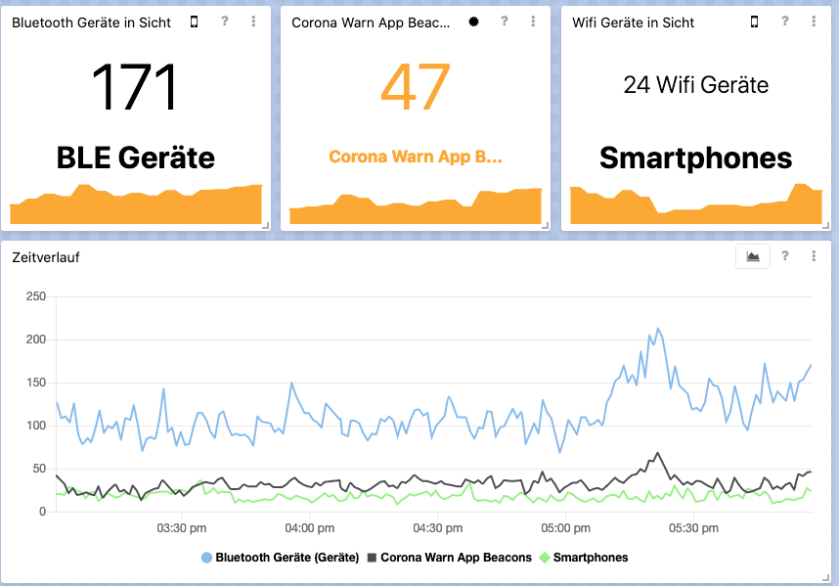
Mit tagio.io habe ich mir ein einfaches Dashboard gebaut. Auf dem ich sehen kann wieviele Bluetooth Geräte gerade in der Nähe sind, wieviele davon wahrscheinlich Smartphones sind und wieviele den Corona Warn-App-Beacon abstrahlen.
Das passt insofern, das ich zuhause ein Android Tablet habe auf dem die App installiert ist und ein iPhone auf dem sie ebenfalls läuft.
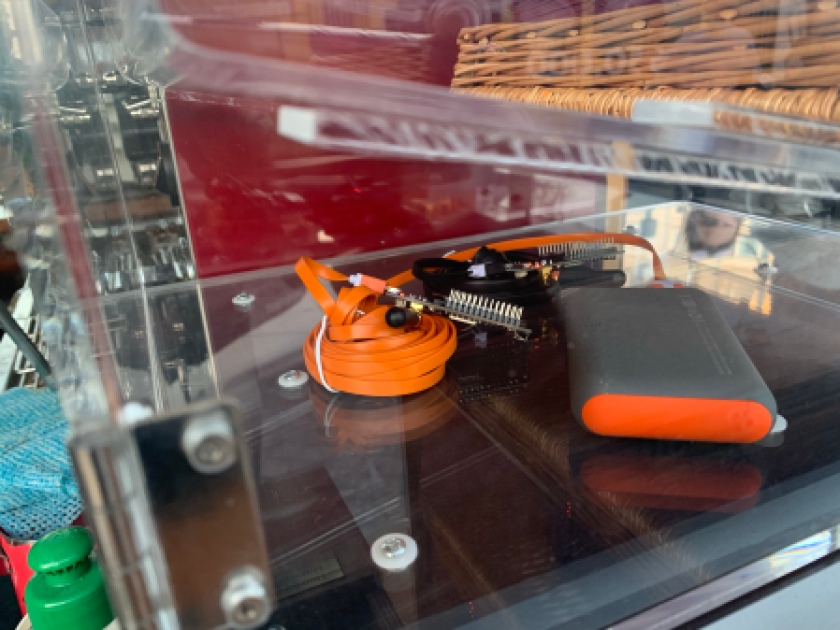
Beide TTGO Boards kommen jetzt zusammen mit einer Powerbank in eine Vesperbrotdose und die kann dann Lastenradbarista mit sich rumtragen. So bekommt man dort nicht nur frischen und guten Kaffee, sondern auch noch ein kleines Citizen Science Projekt.
Meßergebenisse auf der Straße vom Lastenradbarista, an einem Samstag
Und da haben wir die ersten Ergebebnisse. Ich habe heute ab ca 14:30 das Zählgerät beim Lastenrad Barista vorbeigebracht. Der war bis ca 17:00 auf dem Platz. Dazu mal einige Zahlen:
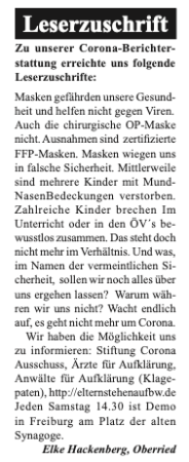
Ich bin einigermaßen entsetzt über einen Leserbrief in der Wochenzeitung „Dreisamtäler“: Darin werden völlig unwiedersprochen eindeutige Fakenews und falsche Inhalte wiedergegeben. Leserbriefe sollen die Meinung der Leserschaft wiedergeben. Aber ebenfalls sollten Leserbriefe nicht zur Verbreitung von Fake News dienen. Deshalb habe ich folgenden Leserbrief verfasst:
Im Leserbrief von Frau Hackenberg sind zahlreiche Falschbehauptungen enthalten, die ich an dieser Stelle richtig stellen möchte. Im Gegensatz zu ihren Aussagen hilft das Tragen von Alltagsmasken gegen die Infektion mit SARS-COV-2 Viren und reduziert auch die Schwere der Krankheit. Völlig haltlos ist die Behauptung es gäbe mehrere Kinder, die an oder mit Mund Nasen Bedeckung verstorben seien. Zahlreiche Medien sind diesen Behauptungen der „Coronarebellen“ oder Bodo Schiffmanns nachgegangen, es gibt keine Bestätigung. Teilweise mußten sogar Bestatter auf Facebook bitten, diese Behauptungen zu unterlassen. Das zu verbreiten ist ein zynisches Spiel mit der Sorge um unsere Kinder. Diese und andere Gerüchte untergraben den Kampf gegen ein gefährliche, potentiell tödliche Infektionskrankheit.
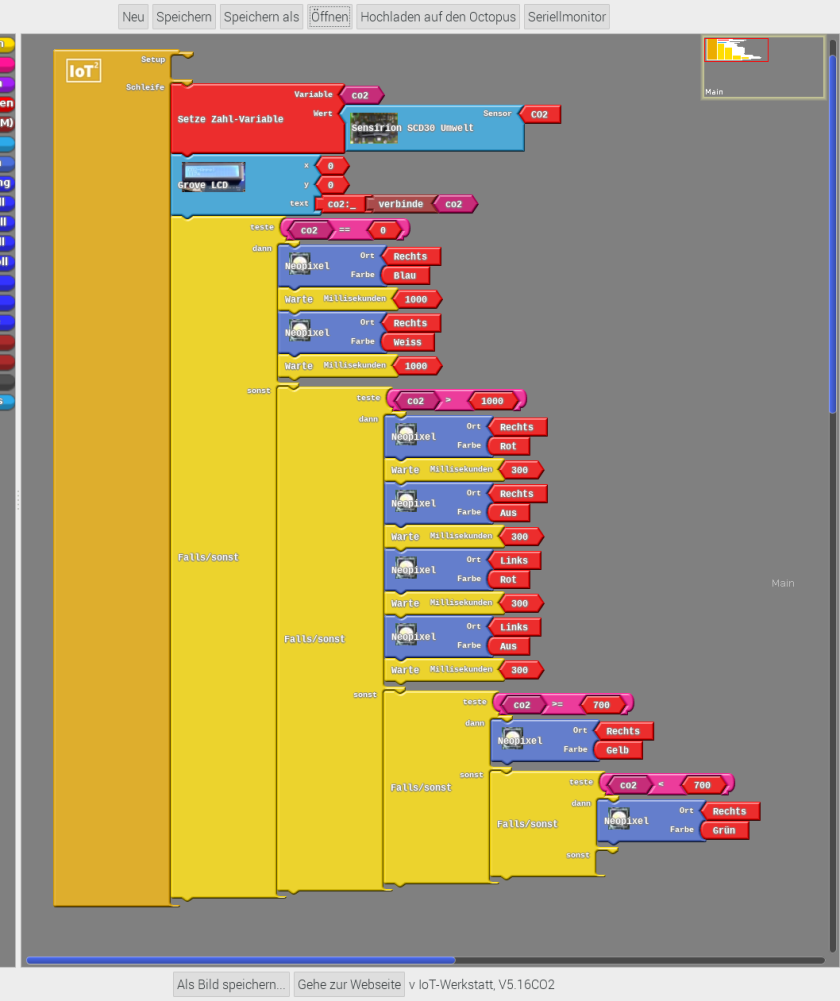
Lange habe ich mich gesträubt einen fertigen Code bzw. ein Bild eines fertigen Ardublock Codes zu veröffentlichen für die CO2, so ist ja ein Teil des Spaßes an den Workshops selbst mithilfe der Fallunterscheidungen (wenn/dann/sonst) herauszufinden, wie man sich so eine Ampel baut. Aber im letzten Bastelworkshop hat ein Teilnehmer den folgenden coolen Code für einen CO2 Ampel auf Octopus Platinen Basis entwickelt:
Was macht der Code: Ganz oben sehen wir die Zahl-Variabel, die bezeichnet die Werte aus dem CO2 Sensor. Als erstes wird der Wert im LCD Display angezeigt. So weit unspektakulär. Dann aber wird es spannend.
Pi & Octopus ?
Die erste Falls/Sonst Unterscheidung testet ob der CO2 Sensor überhaupt einen sinnvollen Wert liefert. Wenn er aber 0 ausgibt, dann blinkt der rechte Neopixel blau/weiß. Die nächsten beiden Fall/Sonst Unterscheidungen arbeiten dann wie immer bei den Ampeln: Zunächst wird geprüft ob der Wert größer ist als 1000 ppm CO2. Wenn ja dann blinkt der rechte Neopixel rot. Wenn nein dann bei über 700 leuchtet sie gelb und bei unter 700 leuchtet sie grün.
Blynk is another way of sending and visualising data, from the Octopus, besides using Thingsspeak. To use Blynk, one needs to register with Blynk and download the Blynk app (available on iOS and Android).
Set up a remote sensing device on Blynk
To set up a data transmitting device on Blynk, one needs to do the following:
From the Blynk app : – Open the Blynk app on your smartphone. – Click on “new project”. – Choose “esp8266” for the “choose device” question. – Wait for the “Auth Token” email that Blynk has sent.
(then) In ArduBlocks : – In the Setup part of your ArduBlocks sketch, add aWLAN block and a Blynk-Cloud block. – In the WLAN block : specify the name of your wifi network and the password. – In the Blynk-Cloud block : the Copy the Auth Token from the Blynk email, and paste it into the API-Key part of the ArduBlocks Blynk-Cloud block.










Du muss angemeldet sein, um einen Kommentar zu veröffentlichen.